|
|
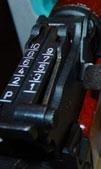
Your
AK should have a Rear Leaf sight that had a series
of numbers on it. The Rear Leaf sight is used to
set the distance (elevation) to the target in meters,
which each number represented in hundreds, for example,
a setting of 1 would be 100 meters, and a setting
of 10 would 1000 meters. At the bottom of the leaf
sight is a letter "P", your letter may
be different, but this is the battle setting. The
battle setting would be used during combat if you
did not have time to figure out the range to the
target, basically on this setting, with a correctly
zeroed rifle you would be able to hit any target
up to 1000 meters with a 16 inch circle or less.
Also most AK rifles DO NOT HAVE a actual adjustment
for windage, if your does it will be located on
the rear leaf sight. Instead, with rifles that do
not have a leaf sight with a windage adjustment
(Romanian AKs do not come with one of these), use
a sight tool or a rubber mallet to move a cylinder
on the front sight, adjusting this while in a combat
situation is tactical unsound. |
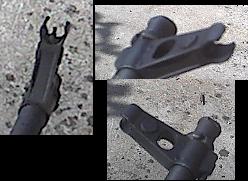
| At
the front of you AK is the front sight, you should
see a peg sticking up through the center of the
front sight. This is the front sight peg, which
is used to adjust the point of impact elevation
up or down. On the left and right side of the front
sight housing you should see a cylinder protruding
on both sides. This is used to adjust the point
of impact left or right and is used in controlled
conditions (such as the range) to adjust the windage
of the rifle if your rear leaf sight has no such
adjustment. |
|
| Before
we start adjusting the sights, we must discuss how
each adjustment will affect the point of impact.
First the leaf sight, as discussed previously, the
numbers represent the distance (elevation) to the
target. Adjusting this will compensate the sights
for the necessary angle required by the bullet to
travel to the target. If your leaf sight has a windage
adjustment then you would adjust it the opposite
direction you want the point of impact to land.
For example if you want to move your point of impact
left you would rotate the windage knob counter-clockwise,
or if you wanted to move your point of impact right
you would rotate the windage knob clockwise.
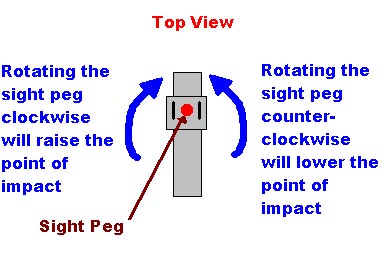
On the front sight, if you rotate the peg clockwise
would raise the point of impact, while rotating
the peg counter-clockwise would lower the point
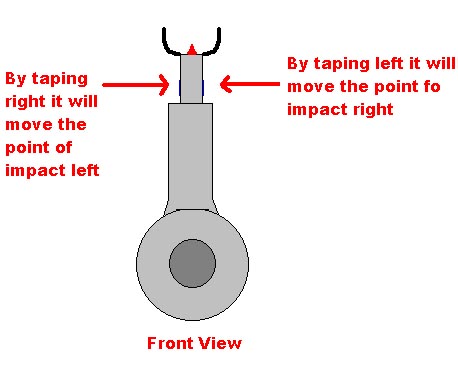
of impact. On the left and right side of the front
sight is a cylinder that can be adjusted to move
the point of impact left or right or to compensate
for windage in controlled conditions (such as
the range). To move the point of impact left you
would drift the cylinder to the right, or if you
wanted to move the point of impact right you would
drift the cylinder to the left. Refer to the below
pictures for more information.
|
|
|
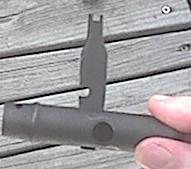
Now
that we have adjustment procedure down we must discuss
the tools used to do the adjusting. The first is
the front sight peg tool. This tool is located in
the tool kit included with you AK (refer to the
Butt Stock Tool Kit in the tutorial section). If
you do not have one I suggest purchasing one or
using a pair of pliers. This tool fits over the
front sight peg and by turning clockwise or counter
clockwise will raise or lower the point of impact.
|
|
|
|
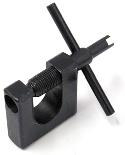
The
next tool required is a rubber mallet and a wooden
dowel roughly about the same size as the cylinder
located in the front site housing. As an alternative
I highly recommend you order one of the "SKS/AK
WINDAGE & ELEVATION SIGHT TOOL" from Tapco
as pictured to the left. With either the rubber
mallet wooden dowel combo, or the tool from Tapco
you can adjust the drift cylinder. To use the rubber
mallet and dowel, place the towel on the side of
the cyclinder and lightly tape with the rubber malet
until it moves in the desired direction. |
| Go
to Page 2 of Tutorial |