 |
| Part
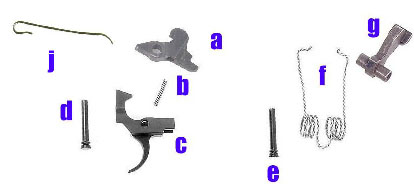
List (For use with the above picture)
A: Disconnector
B: Disconnector Spring
C: Trigger
D: Trigger Axis Pin
E: Hammer Axis Pin
F: Hammer Spring
H: Selector Lever (supporting part, not pictured)
I: Shepard's Hook (Crook)
|
|
The three major parts are the
hammer, disconnector, and trigger. These parts
on most post-ban AKs are US made, if some one
hasn't changed out the ones in your rifle there
is a good chance that they where manufactured
here in the USA so your rifle would be compliant
with the part count laws. Unfortunately some of
these parts are made as quickly and as cheaply
as possible, thus most Romanian AKs ship with
these cheap FCG parts in them from Century. The
little “C” stamped on them can identify
these parts. Because most of these parts are of
a poor quality they have a condition called trigger
slap. If you don't know what trigger slap is visit
the “Trigger Slap Fix” section on the
menu to the left. Since so many of these cheaply
made US FCG parts are placed in factory rifles
it is a good idea to know how to remove them from
your rifle to fix problems, or even better, replace
them with a high quality US manufactured aftermarket
set.
|
| The
five minor parts include the Shepard's hook(crook),
trigger axis pin, hammer axis pin, hammer spring,
and disconector spring. These minor parts are manufactured
in various locations, probably a mixture of both
US and Foreign makes, but since they don't count
towards the parts count in your rifle I don't think
it matters. I highly recommend you purchase a Shepard's
hook(crook) replacement plate from Red Star Arms,
it makes the installation and removal of a FCG a
breeze. |
|
The one supporting part is the safety (selector)
lever, since it interacts directly with the FCG
group I thought it would be a good idea to mention
it here in this tutorial. The Selector basically
is a safety in semi-auto rifles, on full auto
models though it selects between Safety, Semi,
or Continuous (full-auto) fire.
|
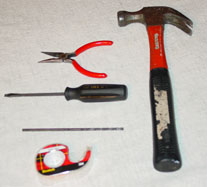
| Before
removing/installing your FCG you will need several
common tools. It is a good idea to have a pair of
needle nose pliers, a small pin punch(I just use
a small metal cylinder of some type), a hammer(or
some thing to bang on the pin punch with, I used
and old drill bit), and a long flat head screw driver.
Make sure you unload your rifle and completely
field strip it. If you don't know how to field
strip you rifle please visit the “Field Striping”
tutorial, which can be found on the menu to the
left.
|
|
|
|
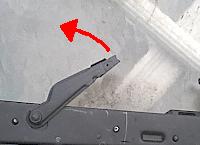
After
field stripping your rifle you must then remove
the rifle selector (safety) lever. Do this by first
discharging the rifle's hammer by pulling the trigger
(make sure the rifle is field stripped and unloaded!)
and releasing it. |
|
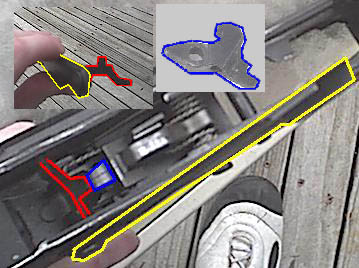
Then Rotate the lever all the way up until the
tab on the end of the lever hits the back of the
disconector, at this time pull the trigger back
to give the tab on the lever some clearance for
removal. View the below photo for more info.
(Note: When the Blue and Red areas contact pull
and hold the trigger back, also ignore the fact
that the hammer is engaged in the photo)
|
 |
| Go
to Page 2 of Tutorial |