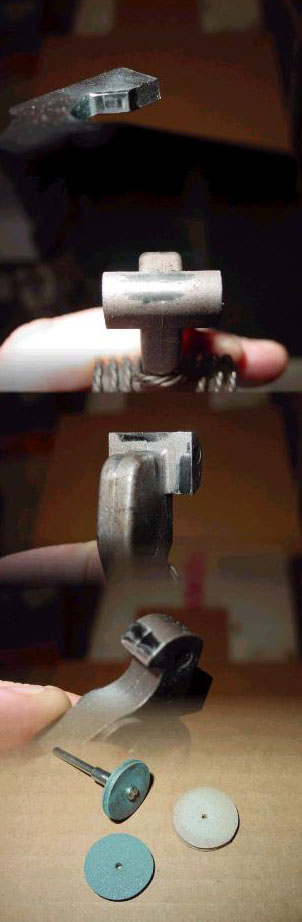
| The above
composite pic shows the FCG surfaces polished on a Romanian
Century US FCG. Polishing the FCG contact surfaces smooths
them up, removes the "grittiness" feeling and
reduces friction.
The surfaces to be polished are in the top four views
of the composite:
1) The underside of the trigger hook(s) and the rearward
face(s) of the trigger hook(s). These surfaces engage
the side wing(s)of the hammer.
2) The side and rear wing(s) of the hammer. These wings
engage the trigger hook(s) and the disconnector hook.
3) The curved underside of the top hammer wing. This
surface "pushes" the disconnector back as
the hammer is cocked by the rearward travel of the carrier.
4) The nose of the disconnector hook. This surface
is in contact with the curved underside of the top wing
of the hammer as the hammer is cocked.
The bottom pics show two Dremel abrasive-impregnated
rubber sheels wheels that I use. The white is less abrasive,
the blue-green is more abrasive. DO NOT use Dremel STONES!
Only use the abrasive-impregnated rubber wheels. If
you don't have access to the rubber wheels at you Dremel
dealer, use the felt wheels with the finest grit Clover
valve grinding compound that your auto parts store has.
You can also use jeweler's rouge. Go slow, and DO NOT
alter the angles of the surfaces or remove any metal.
I use the Dremel on slow to med speed; the wheel takes
off the heat treat scale and puts on a bright not quite
mirror look. That's what you are after, stop there.
Also, on the underside of the trigger hook(s) I run
the abrasive wheel on the sharp edges where the underside
of the hook meets the sides of the hook. Microscopic
burrs on this edge are where the grittiness comes from.
If you use the compounds, dress the side edges of the
underside of the trigger hook(s) with a fine jeweler's
file at a 45 degree angle to knock off the burrs. Only
a couple-three passes will be necessary, then polish.
The overall end result is a perfect two-stage military
trigger effect, the first stage being smooth and grittiness
free until the nose of the disconnector hits the top
wing of the hammer as the trigger is pulled. The second
pull is short and crisp as the trigger hook(s) slide
forward off the hammer side wing(s)."
These instructions are provided for general information
only based on polishing a AK FCG. Neither the author
nor Linx310 can be held responsible for any consequential
damages as a result of an AK owner attempting to disassemble
his or her weapon or while polishing the weapon's FCG
following these instructions.
|